Ceci est une ancienne révision du document !
Client/Server (C/S) Mode Operation
Gestan can operate using two data connection modes:
- “Classic Mode,” in which the Gestan.exe program queries the database directly;
- “Client/Server Mode,” in which the Gestan.exe program queries the HFSQL data server, which in turn queries the database.
C/S mode offers the following advantages:
- improved response times when there is a large number of simultaneous users and/or a large volume of data;
- data protection: data files are no longer directly accessible to users;
- easier database administration: via HFSQL server utilities;
- no additional cost: the HFSQL server is free for both personal and professional use.
The installation of an HFSQL server is detailed in the tutorial below. If necessary, this installation can be performed for you by the Gestan technical support team.
Operating Principle
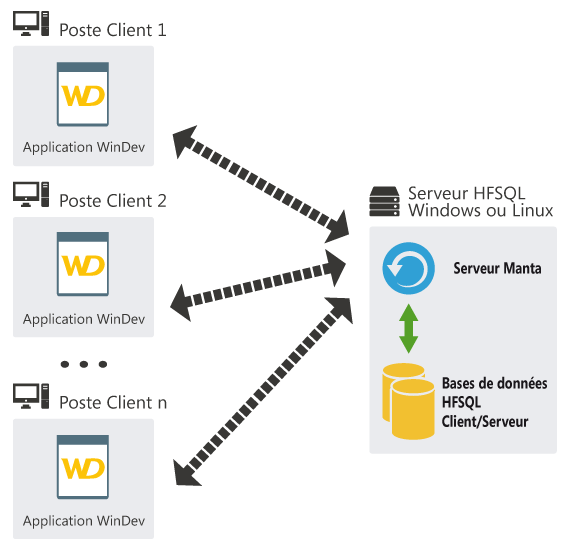 In Classic mode, the program (Gestan.exe) accesses the database directly (the xxxxx.FIC, .NDX, and .MMO files). Data access management is handled exclusively by the operating system—in this case, Windows—using Windows' data sharing system (handling reads, updates, concurrent access, caching, etc.).
In Client/Server mode, the Gestan.exe program communicates with a data server application (the HFSQL server); this server queries the database and returns the requested data. Windows file sharing is no longer used: the HFSQL server alone handles data access on the server machine. From a technical standpoint, this offers two advantages:
- The first is bypassing Windows' network access management, as access is instead handled by the HFSQL data server. You no longer need to worry about updating the network layers on your Windows machines; consistency across the fleet of machines is crucial for the proper functioning of a Windows network. If not all workstations are up to date, Windows network sharing can fail, potentially causing index-data synchronization issues (in which case, simply reindexing the data resolves the problem).
- The second is the ability to access data via the TCP/IP protocol, meaning connections can be made using any method—network cable, USB, Wi-Fi, or the Internet. In the latter case, for example, you can keep the Gestan executable (the `gestan.exe` program) on your local machine or a USB drive while storing the data on a remote server, provided it is accessible via the Internet. It also enables communication with mobile applications.
Installing Gestan in Client/Server Mode
Step 1: Install the HFSQL server
First, install Gestan in “Classic” mode.
Next, install the HFSQL server. It is available for free on the PCSoft website for both Windows and Linux (you can even find a load-balanced cluster version there for use cases involving a very large number of users).
By default, the program installs to `C:\Program Files\PC SOFT\Serveur HFSQL`.
You can install the HFSQL server on:
- your company server, if available (recommended solution)
- any standard machine on your corporate network (note: if you turn it off, no one will be able to connect to Gestan). * an older machine running Linux can be a good solution: very low cost and high efficiency
- a hosted server (seen at a client site: Gestan C/S running on an entry-level OVH server, costing €5/month – though connection quality must be considered)
- a NAS (be mindful of the machine's performance: there is a risk of poor response times depending on the NAS's capabilities)
The machine hosting the “server” component of the application does not necessarily need to run a server-grade operating system (Windows Server, Windows Enterprise Server, Linux Server, etc.). A standard PC running Windows 7, 10, or 11, or a Linux desktop distribution, is sufficient. However, server versions of operating systems are superior and will positively impact the software's overall performance.
You can find many videos online, for example:
Step 2: Configure the HFSQL server
Users
During installation, you can set up usernames and passwords for users authorized to connect to and/or administer the server.
Data location

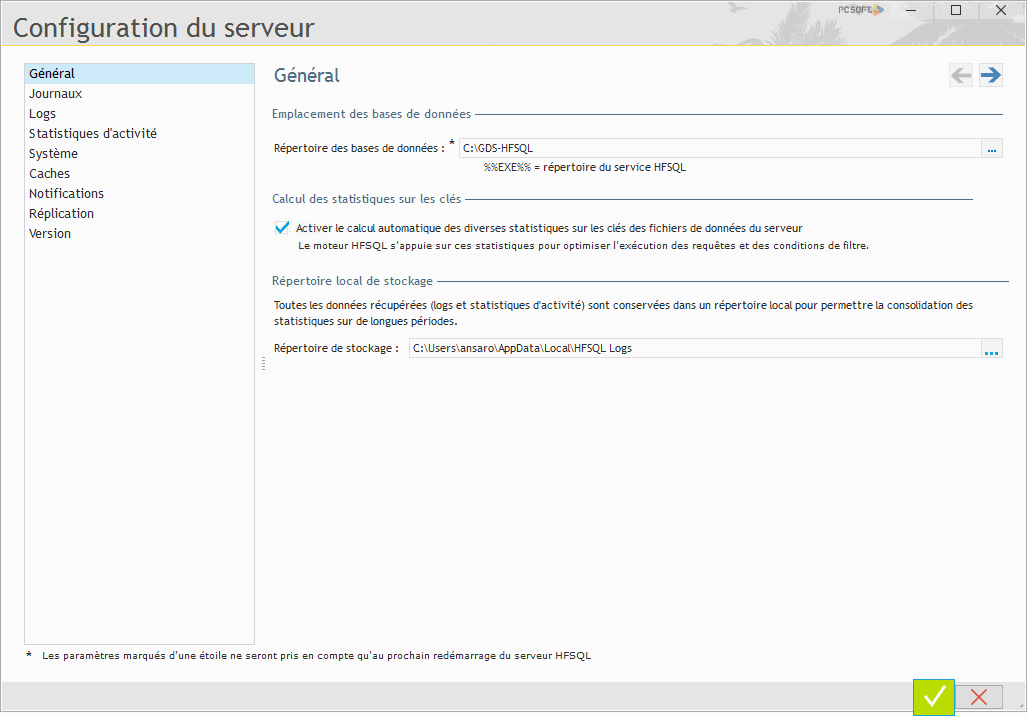
The Database directory field on the Configuration tab specifies where the databases are stored.
By default, the directory is %%COMMONAPPDATA%%\PC SOFT\Serveur HFSQL [server name]\BDD—for example, C:\ProgramData\PC SOFT\Serveur HFSQL srv1\BDD on a machine with the Windows name “srv1”.
It is advisable to specify a more easily accessible directory, such as C:\BDD-HFSQL, particularly to make backups more convenient.
 To stop the HFSQL services: go to Control Panel → Administrative Tools → Services, and stop the “Hyper File Server” and “MantaManager” services.
Step 3: Importing a database
You must now import your “Classic” database into the HFSQL server using the button below.

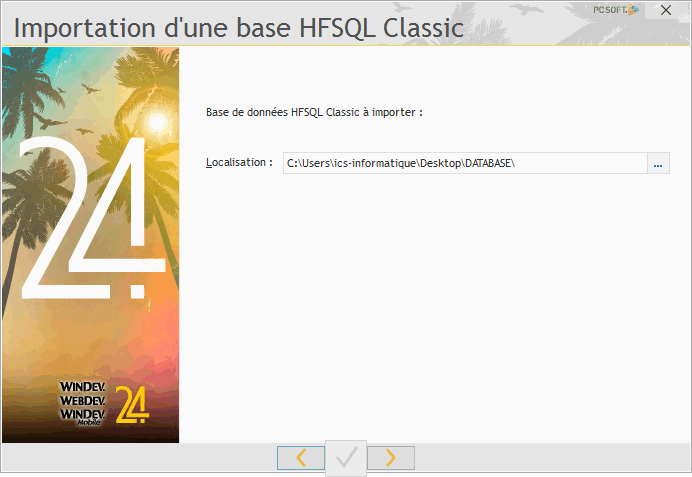
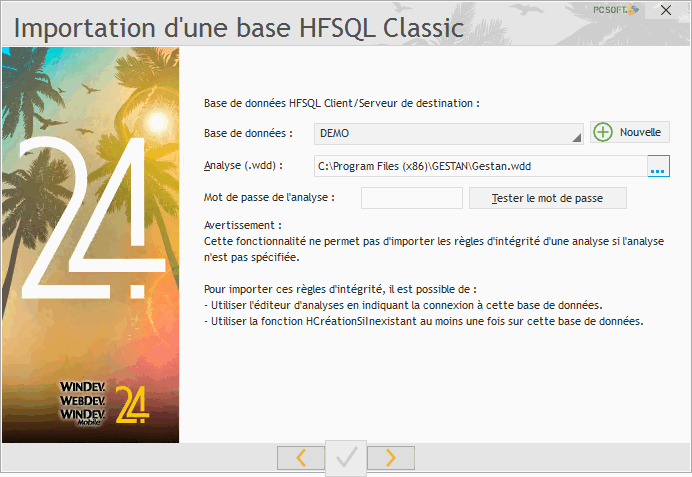
The Control Center will ask you to specify:
- the physical location of the database to be imported. Point it to the directory containing the files to import (files such as ACTION.FIC, ACTION.NDX, ACTION.MMO, etc.)
- the name of the database as it will be known to the HFSQL server.
- the location of the analysis: point it to the directory containing the Gestan.wdd file. You will find it in C:\Program Files (x86)\GESTAN if you installed Gestan using the standard method.
Since January 1, 2018, French law has required software vendors to implement data locking; consequently, all Gestan files are encrypted and password-protected. However, you do not need these passwords for the import process: to make the password optional, simply leave the analysis file path blank.
Step 3b - Link cleanup

Starting with versions 15.41.00/U03, Gestan includes a menu specifically for client/server installations: Tools → Administration → Special tools → Link cleanup. This procedure cleans up any erroneous database links that may have been created randomly during the import process. This is a long-standing bug in the HFSQL server; it was reported to PCSoft about ten years ago, but they have never taken the time to fix it.
More details: link cleanup.
Special thanks to Yves B., an IT consultant, for identifying this issue.
Step 3c - Creating a dedicated Gestan user
By default, the HFSQL server installs with an “Admin” user who has super-admin rights across all databases. Depending on your security requirements, it may be advisable to create a specific user in Gestan—one who is not a super-admin on the HFSQL server—and assign them specific database permissions, as shown below.

Step 4: Check the firewall
The HFSQL connection normally uses port 4900, though you are free to use a different port. The HFSQL server installer usually opens this port automatically, but if you need to verify it, here are the details.
The communication port (normally 4900) must be open for TCP traffic, as configured below (you can restrict the exception to your internal network).
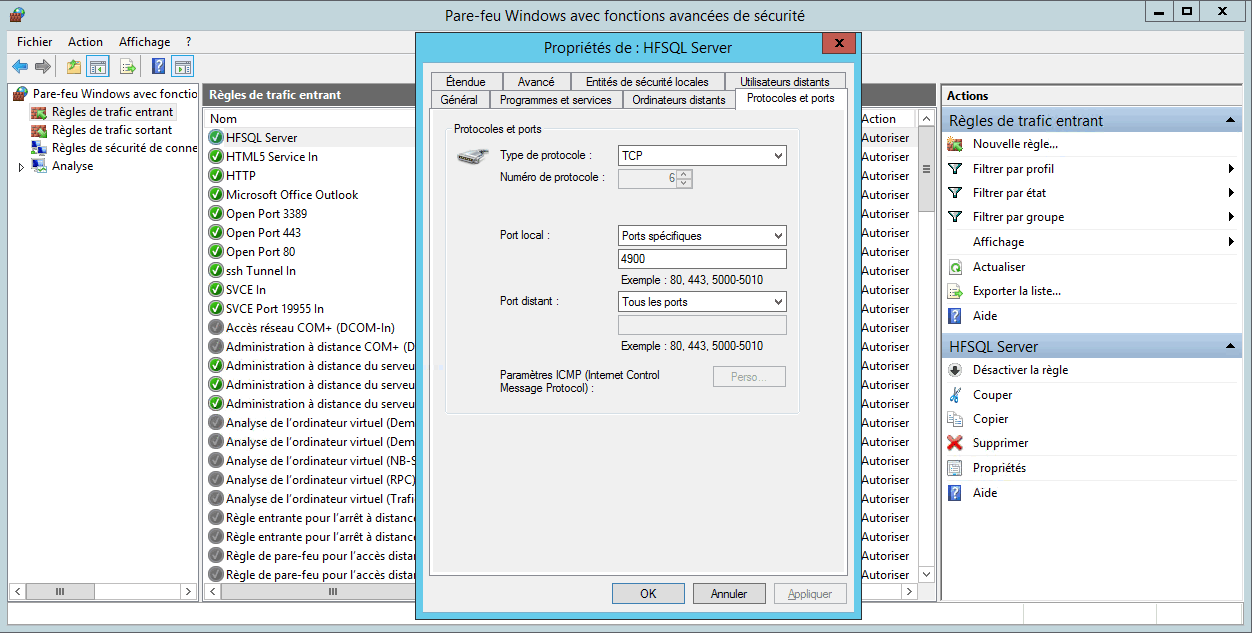
- On Windows 2012
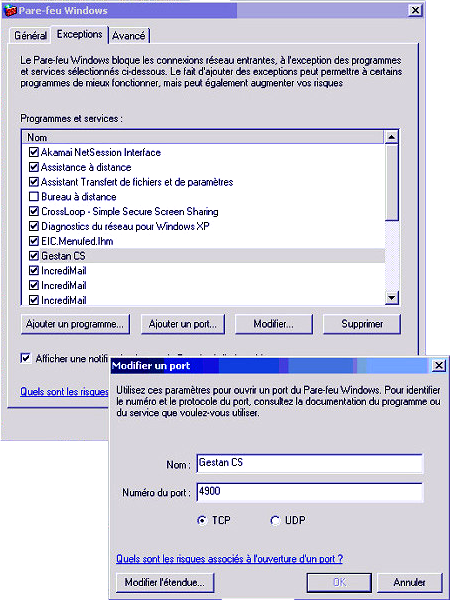
- On Windows Server 2008 R2
To verify that port 4900 is open, you can use telnet (telnet [IP] 4900).
Step 5: Check the internet router
If you have an internet router and a local network, you will likely need to add a port forwarding rule.
Below is the configuration for an Orange Livebox for an HFSQL server installed on machine 192.168.1.100.

 This configuration works with a Livebox V3; it differs for the V4. * HFCS server inaccessible after Livebox change (PCSoft forum)
- HFSQL Client/Server: Port management (PCSoft)
If you want your server's Gestan data to be accessible remotely via the Internet (using the HTTP protocol), you must open TCP port 4900. On client machines, you will need to specify your server's IP address.
You will need to open a port in the firewall protecting the server.
You can choose to either:
- Place the server in the DMZ; all server ports will then be visible from the Internet. If the server is protected by its own software firewall (e.g., Windows XP SP2, iptables on Linux), you must open the HFSQL server port (which is 4900 by default).
- Configure port forwarding on your router/firewall. You must add a rule to the router specifying that incoming connections from the Internet on port X be forwarded to the machine hosting the HFSQL server on port 4900 (or the port specified in HFConf.ini).
Similarly, if the client machine uses a firewall, it must allow applications to connect outbound via the port being used.
Step 6: Configuring the connection in Gestan
Next, you need to enter the connection settings in Gestan.
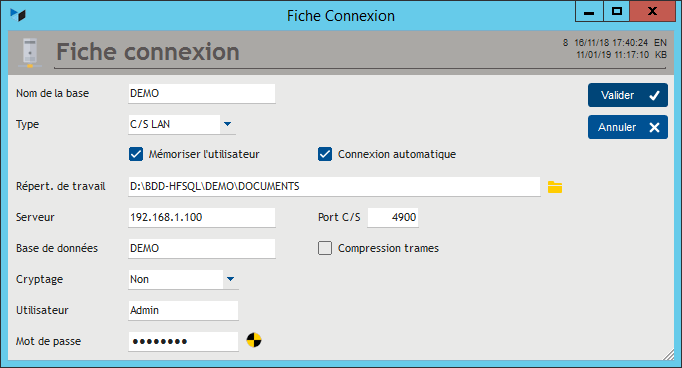
To do this in Gestan, go to the Tools → Administration → Multi-company management menu, then click the New button.
Define the connection as detailed for LAN mode or WAN mode.
And that's it!
Speed Test
Response times depend partly on the quality of your Internet connection; you can test its speed.
Migrating from Gestan C/S to Gestan Classic
Reverse migration—switching from Gestan C/S to Gestan Classic—requires two steps:
- Copy the *.fic, *.ndx, and *.mmo files (i.e., all files) located in the Client/Server data directory (see this link) and paste them into a local DATABASE directory (e.g., C:\GESTAN\DATABASE).
- Then, within Gestan, go to the “Multi-company management” menu and set up a new Classic connection, specifying this local directory as the base directory (in this case, C:\GESTAN).
Backing up a C/S database
Defining a robust backup strategy is the primary responsibility of any company's IT manager.
While not the only solution, the control center includes a tool for automating backups.
To do this:
- Click on the database to be backed up.
- Click the “New backup” button.
- Expand the displayed menus. You can choose not to store the indexes, as they can easily be recreated from the data. * Regarding backup scenario options, you can choose “full monthly backup + daily differential backup.”

Verifying that backups are working correctly is part of the backup strategy!
Recommendations for the physical server
Although this information is slightly dated—thanks to Guillaume Bayle - PC Soft—it remains relevant.
What should you focus on for a proper Client/Server configuration? (Some points also apply to optimizing response times in standard network mode.)
RAM
The most important factor is having sufficient memory on the server. If memory runs low, the system uses a disk-based swap file, causing performance to drop—potentially degrading it severely if the swap file is located on the same disk as the HyperFileSQL Client/Server engine data.
Generally speaking, 16 GB of RAM is a good starting point. This is the standard memory capacity for current server configurations.
To accurately assess the required amount of RAM, you can conduct “real-world” application tests and analyze server activity statistics. Simply go to the “Logs and Statistics” tab in the HyperFileSQL Control Center, then:
- specify the test period,
- click “Display,”
- use the “Settings” tab in the “HyperFileSQL Server Activity Statistics” window to view RAM usage, cache utilization, etc.
This allows you to precisely evaluate the RAM used by one or more connections, in order to… to estimate the RAM required based on the number of workstations to be connected to the server upon deployment.
Do not forget to take into account the RAM …also required by the system (8 GB for Windows 11, which is very resource-intensive) and by other applications.
Disk speed
Fast drives (7,400 rpm, or 15,000 rpm if possible) improve response times; SSDs offer the best performance.
If possible, separate the data drive from the system drive (especially for the swap file). To move the swap file, see here or there.)
Processor quality
Processor speed affects server responsiveness. A “Xeon” processor (or higher) is recommended if the applications perform significant processing on the server (stored procedures, triggers, etc.).
Network quality
Use high-quality routers. In particular, the routing capabilities of some standard ISP gateways/routers are notably poor.
Operating system
In a 32-bit environment, a single process cannot allocate more than 2 GB of memory (in practice, the maximum is around 1.6 GB). A 64-bit processor allows for memory allocation beyond 2 GB. Install the HFSQL server in 64-bit mode only.
The HFSQL engine is available for both Windows and Linux; the choice depends on the habits and expertise of the administration teams.
For Windows, any version is suitable. However, a “Server” edition is preferable for optimal performance and system security.
For Linux, the most widely used distributions are Debian, openSUSE, Ubuntu, Fedora, and Mandriva. See also on the PCSOFT blog:
Accessing HFSQL files via SAMBA on Linux
If the HFSQL server is installed on Linux and file access is managed via SAMBA, specific configuration is required. In the `smb.conf` file (commonly located at `/etc/samba`), you must add or modify the following parameters within the `[global]` section:
[global]
locking = yes
strict locking = yes
share modes = yes
oplocks = no
kernel oplocks = no
blocking locks = no
fake oplocks = no
level2 oplocks = no
Next, you must restart the Samba service to apply the new configuration.
ℹ️ Other “Admin” articles
Base de test
Benchmark lectures
Connexion administrateur
Crédit-temps
Extensions Gestan
Fonctionnement en mode Client/Serveur (C/S)
Formations Gestan
Historique des modifications
Impression d'étiquettes
Installation de Gestan - Mode Classique
Journal des événements de l'application
Licence des extensions *
Licence Gestan
Messages désactivables
Migrer son ERP actuel vers Gestan
Multilinguisme
Nettoyage des liaisons C/S
Ordinateurs du réseau
Prise de main à distance
Sessions
Support Gestan