Table des matières
Receipts/Payments
Receipts and payments are the sums of money that come into and go out of your bank accounts or cash register.
These incoming or outgoing transactions can be broken down into several sub-entries.
To ensure the accuracy of these entries, you need to carry out bank reconciliation, i.e. comparing the balances of incoming and outgoing transactions on your account with the bank statement provided by the bank.
List of incoming and outgoing payments
Access: Accounting → Receipts/Payments
The screen displays the entries recorded for the selected month and account.
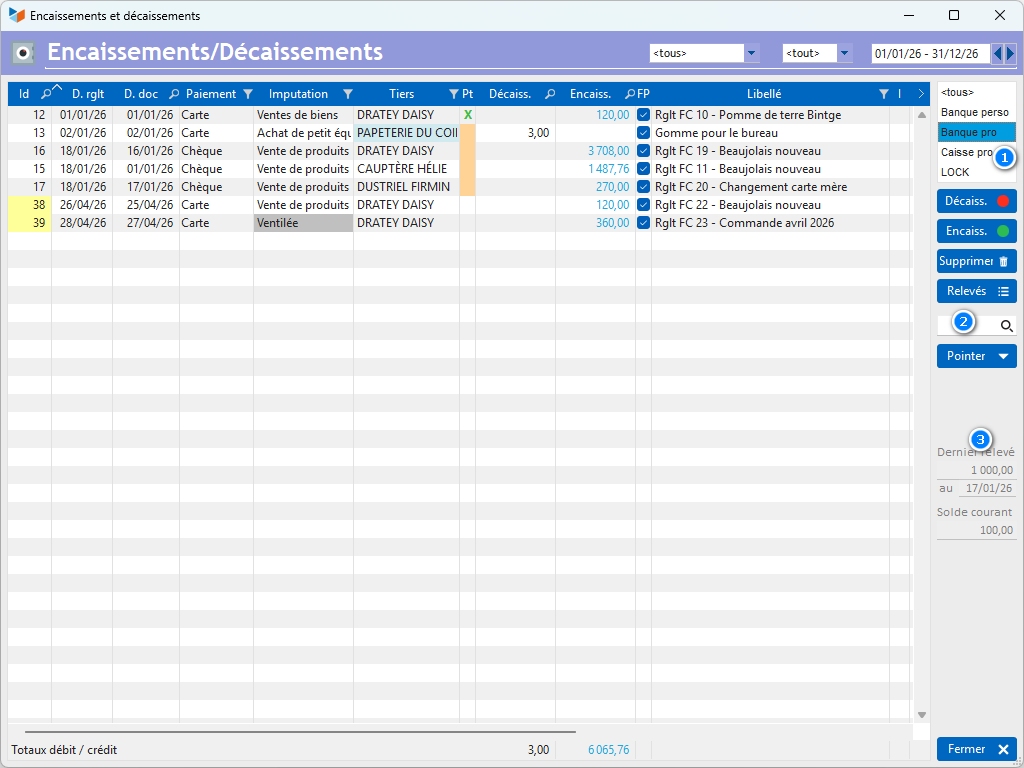
The list 1 shows the unclosed bank accounts (if required, you can view the closed accounts via the context menu in the list of accounts).
The buttons Payments and Receipt buttons allow you to enter a payment or a receipt respectively.
The Statement button displays the list of Bank account statements account statements for the selected bank account.
The search field 2 allows you to filter entries based on the text entered (combined search by payee, description, cheque or deposit slip number, amount including VAT, or entry ID).
The Reconcile allows you to use the table in reconciliation mode, in order to carry out the Bank reconciliation bank reconciliation.
On the right-hand side of the screen 3 shows the balance from the last account statement for the account selected from the list.
The “Current balance” field shows this amount from the last account statement, plus all incoming payments to the account and minus all outgoing payments, for all transactions where the transaction date is strictly after the statement date.
 The CYBERBANQUE extension allows you to import bank transactions in text format.
==== The context menu for the ‘ ====’ table
Main menu
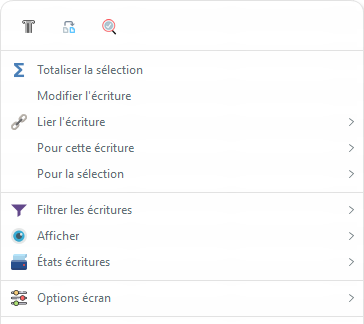
- Total selection calculates the total for the selected rows (multiple selections possible)
- Link entry allows you to link a journal entry to a customer or supplier document, and/or to a project and a task. When Gestan generates a journal entry via the Collect button in the invoice list, the entry is automatically linked to the purchase or sales document.
‘For this entry’ sub-menu

This allows you to:
- Attach an image allows you to link an image or a PDF (a scan of a receipt, for example) to the entry.
- Move to after the closing date allows you to move all un-reconciled entries to after the closing date. This is useful at the end of a reconciliation, to move any entries that were incorrectly recorded with dates that were too early.
- Schedule : i.e. to set up a recurring entry. For example, if you pay a monthly mobile phone subscription, you can set up a monthly outgo that will be generated automatically
- explicit breakdown : that is to say, specifying the ‘breakdown’ of a transaction; for example, stating that on an internet subscription invoice, XXX euros are subject to 20 per cent VAT, and YYY euros to 10 per cent VAT.
If the extension GESTAN_TRESO is installed, it also allows you to budget for, i.e. to mark the entry in question as recurring and take this into account in your cash flow forecasts.
‘For selection’ sub-menu
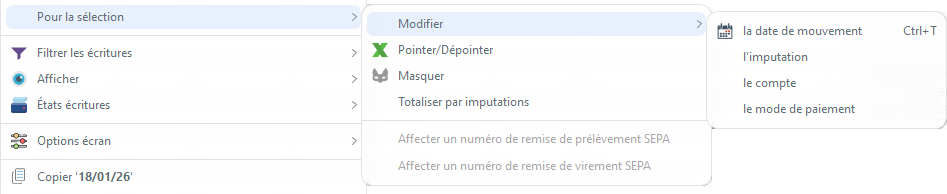
The menu For selection allows you, amongst other things, to make bulk changes to a selection of entries, for example to change their account allocation.
The menu Journal Entry Reports enables you to print a wide range of reports relating to journal entries, including:
- the cash receipt
- the receipt (or acknowledgement)
- the cheque (allows you to print the cheque corresponding to the selected entry on pre-printed paper).
‘Screen Options’ sub-menu
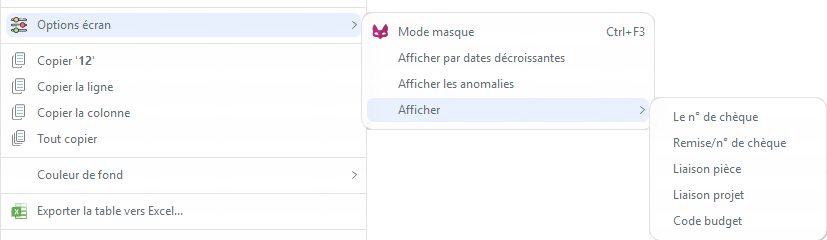
The Mask mode allows you to hide or show entries. This is very useful when reconciling entries (see below).
The entry record
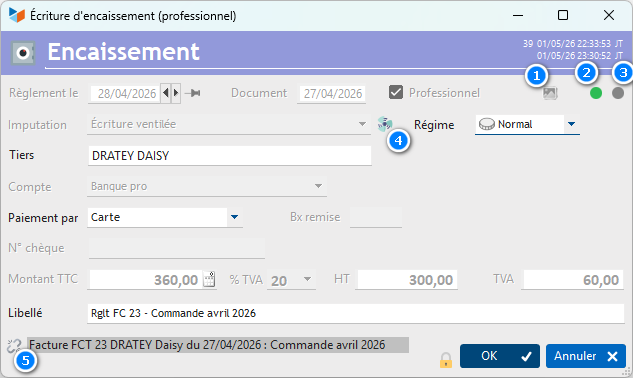
The date of Settlement is the date on which the receipt or payment was actually made.
The Document is the date, if any, of the document to which it relates. For an invoice receipt, for example, this date is the invoice issue date. This information is useful if you have recorded a payment without the corresponding supplier invoice, or if you have paid using a deferred-debit card.
The image 1 allows you to attach an image to the entry, for example a scan of the expense claim or invoice.
The indicators 2 and 3 indicate whether the entry has been reconciled or justified. In this case, they are green.
The account allocation is a ‘plain text’ description that links the entry, its account code and its contra account code. Its context menu allows you to create new account assignments, if necessary. If the entry is broken down, the drop-down menu can no longer be edited, and a 4 allows you to open the Ventilation des écritures.
The nature allows you to distinguish whether the entry relates to a deposit, an advance payment or something else. This is information for reference purposes only and has no accounting implications.
The third party is the person involved in the entry – the person paying you or the person you are paying. In the case of an invoice, the third party is automatically the customer named on the invoice. In the case of a journal entry without a specific supporting document (for example, a restaurant bill), you can select a third party from your contact database or simply enter a description.
The Account is the account (bank account or cash account) to which the transaction is posted.
In the case of a payment by cheque, you can enter a cheque number, which must be formatted as a bank code followed by a number, separated by a space. The context menu for the cheque number field allows you to select a bank code. In the case of a payment by LCR, you can enter the corresponding LCR number.
The VAT may be pre-displayed based on the account allocation. For VAT at non-standard rates, select ‘Other’ from the VAT drop-down menu: you can then enter a gross amount and a net amount separately; the final VAT rate will be calculated when the entry is confirmed.
 Incorrect VAT rates. If you have a journal entry with, for example, a total including VAT of 15.95 and a total excluding VAT of 15.12, Gestan will display a VAT rate of 5.49, as this is calculated based on the figures provided and rounded (the rate is 5.48941). To obtain a rate of 5.5 per cent, use the context menu for the total amount including VAT Apply VAT. This menu will allow you to enter a VAT rate. An unrounded pre-VAT amount will be calculated (but the displayed total will still be 15.12), and the VAT rate will be set to its correct value, i.e. 5.5%
The bottom of the record 5 shows any links the entry may have to an invoice, a till receipt or an expense claim. In the case of a split entry, an indicator shows whether the split is valid.
A padlock is displayed if the entry can no longer be edited (locked entry).
Link between invoices and journal entries
When you use the payment button in the list of invoices, the payment generated includes an automatic link to the settled invoice: when you request to view payments for a particular document, this allows you to view the journal entries linked to that document.
It is possible to manually delete and create these links. If a link is created to an invoice, thereby settling it, the invoice’s status will be set to “paid”. If a link to a paid invoice is deleted, the invoice’s status will be set to “payment pending”.
Entering an amount in a foreign currency
All transactions are expressed in the reference currency, as specified in the general settings.
To express the amount in another currency, once the amount has been entered in the Amount incl. VATfield, the context menu for the field (or the F2 key) will open the screen shown below.
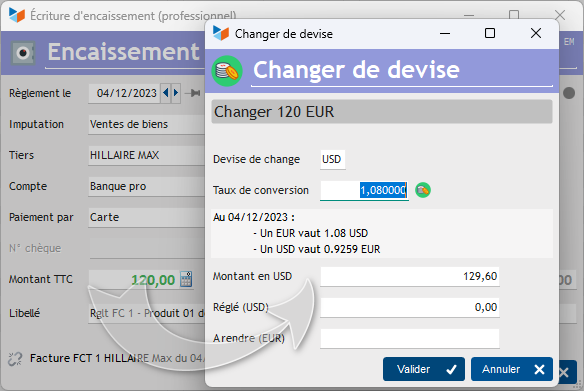
Specify the currency into which you wish to convert the original amount. The 1 allows you to look up the current exchange rate for the specified currency (via the European bank’s website. Requires an internet connection).
If the customer pays you, enter the amount in the Paidfield. The Change due field will then display the amount you need to give as change.
The Confirm button will populate the Amount incl. VAT field in the journal entry form with the converted amount.
ℹ️ Other ‘Accounting’ articles
Arrêtés de TVA
Balance
Balance tiers
Calcul de la TVA
Certification des logiciels de caisse
Clôture comptable / Exercices comptables
Comptabilisation des DEEE
Comptabilisation des écritures
Comptabilité avec Gestan : principes de base
Comptabilité en partie double
Compte bancaire et de caisse
Compte de résultat
Créances irrécouvrables
Encaissements/Décaissements
Export CFONB
Export SEPA
Export XIMPORT des données comptables
Facturation par taux de taxe
Grand Livre
Immobilisations
Imputations comptables
Journal
Journaux comptables (codes)
Lettrage
Liaisons comptables
Liaisons en masse : écritures
Micro-Entreprise / Auto-Entreprise
OD (opérations diverses)
Options des documents comptables
Paramétrage comptabilité
Pièces sans imputation
Plan comptable
Pointage TVA
Produits et Charges
Rapprochement bancaire
Relevés de compte bancaire
Remise de chèques
Revue des écritures
Soldes de gestion
Taux de TVA
Ticket Z
Trésorerie prévisionnelle *
Trésorerie simplifiée
Ventilation des factures par échéances
Ventilation des écritures
Ventilation détaillée par taux de taxe